There are different control and sensitivity settings useful for headshots in Free Fire. It is important to adapt them to the type of weapons you mainly use. For example, handling shotguns is different from using sniper rifles, since you will need greater sensitivity in the first case.
Below we tell you some adjustments and tests that we recommend doing to find your best configuration in Free Fire.
Try different sensitivity settings
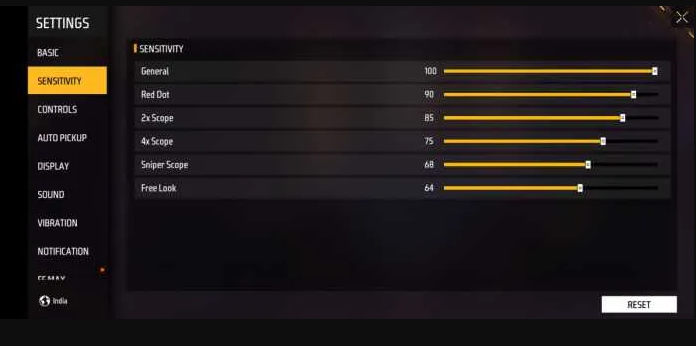
We all seek to have the perfect sensitivity for all situations. Especially for headshots! However, just because a setup is ideal for some players doesn’t mean it is ideal for you. Below we share an image with some sensitivity adjustments. We use these for medium range combat with assault rifles.
Depending on the combat distance, our recommendations are the following:
- Medium Range : If you use assault rifles, experiment with the setup above. The Mira 2x between 30 and 50 is usually ideal. Other changes you can make are raising the sensitivity of the Red Dot Sight and Free Camera to 70-80. Also raise the 4x Scope to 50 or more if you usually fight relatively close.
- Short Range : If you prefer to wield shotguns or light machine guns, make sure you have General, Camera, and Red Dot Sight set to high values. We recommend between 60 and 90. When you have enemies very close to you, you need to move the crosshairs quickly to aim at their heads and hit each shot.
- Long distance : we recommend setting Mira 4x and Mira AWM between 10 and 30. At this distance, you want the scope to move little when you slide your finger or move the mouse. If you find it difficult to move the sight with this configuration, increase the value for both sights little by little until you feel comfortable.
We emphasize that these are only recommendations. Adjusting the sensitivity is vital for hitting headshots, so test with higher or lower values. Sooner or later you will find the best configuration!
Which to choose between default aiming and precise aiming
In the Free Fire settings, within Controls, there is a section called Aiming Accuracy . There are three options to select: Default, Precise Aim, and Full Control. We do not recommend activating the full control option unless you are a very experienced player. Of the other two options, choose the one that best suits you.
What each option does in aiming accuracy is:
- Default : With red sights, your character will automatically aim at the enemy’s chest when you shoot them. The same thing happens when you shoot with your eye on the crosshairs. Of course, you can raise your sights to hit the head. If it’s difficult for you, be sure to turn up the sensitivity .
- Precise in Aim – This option is similar to the previous one, but gives you complete control of the camera when putting your eye in the crosshair.
- Full control : Free Fire gives you complete control over the operation of the camera and sight. The sight always has to be moved manually; That is, it will neither move automatically nor follow the enemy while you shoot.
By default and precisely in view, they are equally valid options. The advantage of the default option is that you will be able to follow the enemy more easily, whether you have your eye on the crosshairs or not. Activate the precise in crosshairs option if it is more comfortable for you to have the freedom to move the camera with your eye in the crosshairs.
How to raise your crosshairs in Free Fire
With auto-aim, it’s normal to shoot at enemies’ chests instead of their heads. To raise the sights, hold down the fire button and slide it up a little . You can slide the button describing a J, a C, a straight line, etc. Try different ways!
Depending on your setup and sensitivity, you may find it difficult to raise your sights. Fortunately, there are two modifications to make that serve to better raise the sights and take headshots.
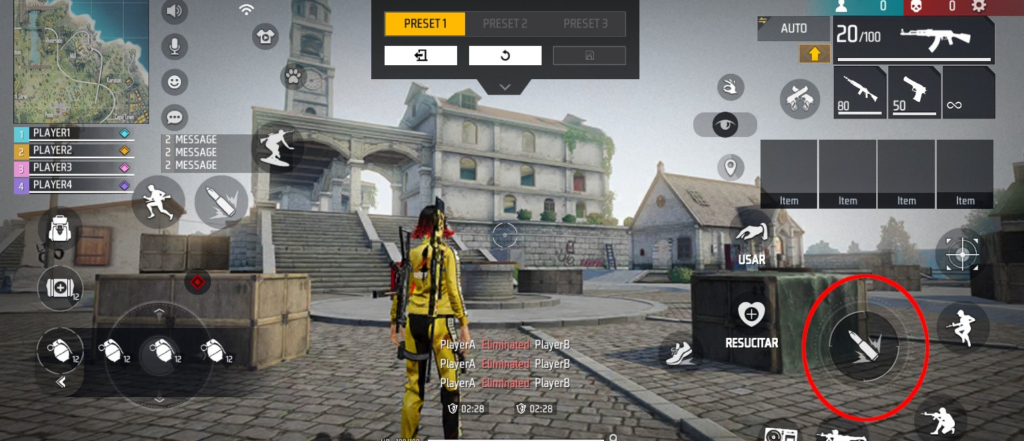
On the one hand, if you play Free Fire on a cell phone or tablet , it is good that you take some time to adapt the interface. You can do this by going to Settings → Controls → Custom HUD . This section allows you to change the position, transparency and size of many buttons. We recommend having the transparency of all buttons at 50% or even less, so that they do not block your view.
Regarding the shoot button , change the size to 60 or more and place it within the red zone that we marked in the image above. To raise the sight comfortably, you will need space in the area above the fire button. If you play on a small device, move the button to a lower area, thus opening up more space to slide the button up.
The second modification is to increase the sensitivity a little . With Default or Precise Aim set to Aim, the Aim will tend to aim at the chest of enemies. With insufficient sensitivity, you will barely be able to raise the sights! Go up the sensitivity values a few notches and try again. Keep doing this until you lift your sights easily.
Take tests in the training room
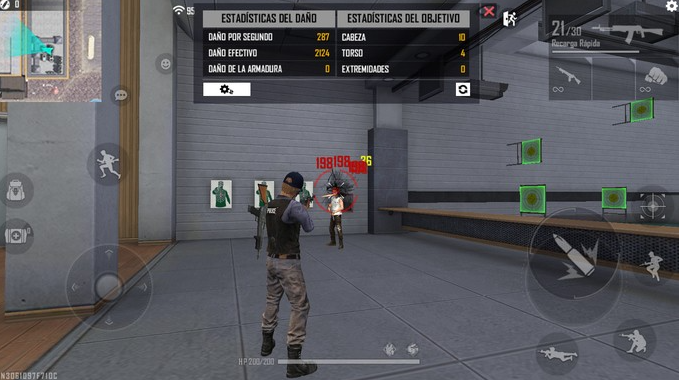
Free Fire includes a training room where you can handle all weapons. It’s the perfect setting to try out different settings and sensitivity settings. To select this mode, go to the mode selection in the main menu. At the bottom right you will see Training mode .
In the main training room there are targets and a static character. There are boxes with all kinds of weapons and accessories to customize them. This area is ideal for you to try out different sensitivities without worrying about surviving or winning the game. Take advantage of the static character to see how many times you land headshots.
Training mode also includes a combat room, indicated by the two knife symbol. The battle room takes you into a scenario with other real players. It is very useful, as you can simulate the skirmishes of a real game and it will help you find the best settings and sensitivity in Free Fire.


